Test a small walk-through laundry room during loading as well as closed: the route between its two openings has to share the floor with open doors and baskets. In the 8 × 10 ft example, the aisle is 58″ with everything closed, but an open door and a person with a basket take 82″ from the wall, leaving 14″ beside them.
A small walk-through laundry room needs to work while someone is doing laundry, not only while the machines are closed. If the room connects the kitchen to the garden, garage or another everyday destination, draw that journey alongside loading, unloading and carrying a basket.
The two routes may share space at some moments and compete at others. An empty aisle can look generous until a washer door opens across it. The useful plan shows what happens during the busiest ordinary task, then checks whether the room's other journey still works.
Use the Small Laundry Room Layout planner with its second opening to compare a through-route. The examples below explain the tradeoff with selected measurements; the route width is a planning input, not an accessibility or building-code standard.
Identify the journey that must stay available
Begin by naming the two destinations and how often people travel between them. A route to a frequently used back door has different demands from an occasional trip to a store cupboard. Record whether anyone carries shopping, walks a dog or accompanies a child through the room.
Draw the actual opening positions, not just one doorway at each end of a rectangle. Offset openings can make the journey turn around a counter. Add hinged door swings, handles and any furniture immediately outside the room that affects entry.
Identify whether the route has specific access or emergency-escape requirements. Those need checking with the appropriate local authority or professional; a furniture planner cannot approve them. Do not assume a route can be blocked temporarily simply because laundry takes only a few minutes.
Next, choose a practical route target for the comparison. Keep it the same between versions so the test is meaningful. Making the target narrower whenever a cabinet is added can conceal the cost of that cabinet instead of helping you choose.
Think about who uses the route, too. An able-bodied adult walking without a basket is only one situation. Test the intended users and what they carry rather than treating a line on the floor plan as a complete movement assessment.
Check the closed-room route first
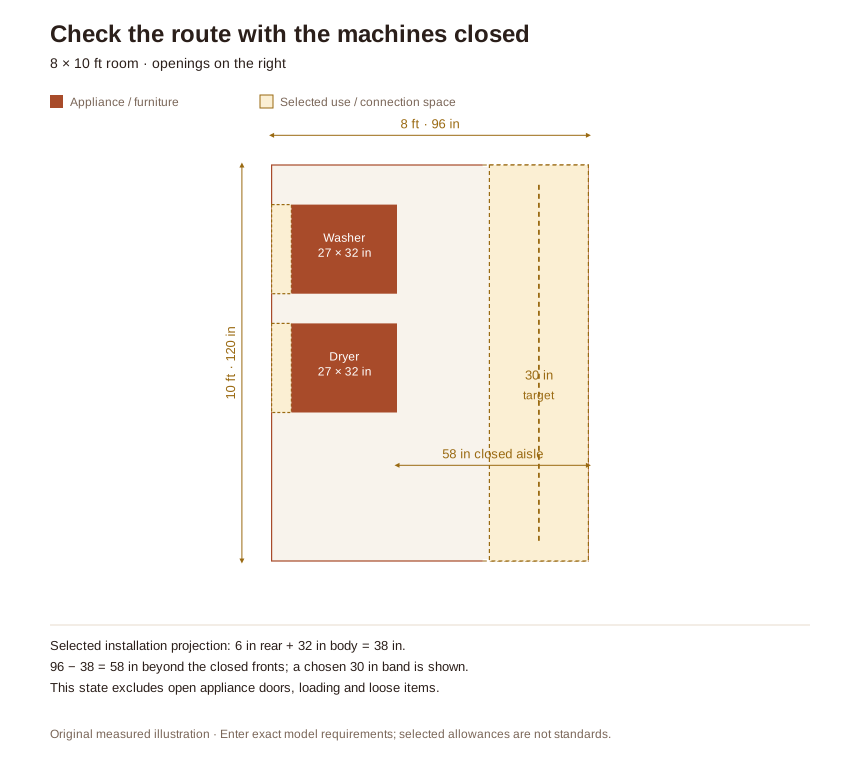
Our example room is 8 feet wide and 10 feet long, or 96 × 120 inches. Two hypothetical appliances sit along the left wall, facing into the room. Their bodies are 32 inches deep, with a selected 6-inch space behind them, so their fronts project 38 inches from that wall.
The openings lie toward the right side of the room. With the appliance doors closed and no loose items in the aisle, the drawing has room for the selected 30-inch band. That is a useful first check, but it describes only this closed state.
The 6-inch rear allowance is hypothetical. The correct distance depends on the equipment and installation. Do not move a dryer closer to the wall merely to recover a few aisle inches: Whirlpool's venting guidance identifies pushed-back appliances as a cause of crushed venting.
Check the closed arrangement for other fixed projections. Cabinet handles, a sink rim and a drying-rack bracket can occupy more space than the main body shown in a product photo. Record the full outside dimensions of each piece before deciding the route is clear.
Open the machine and add the person using it
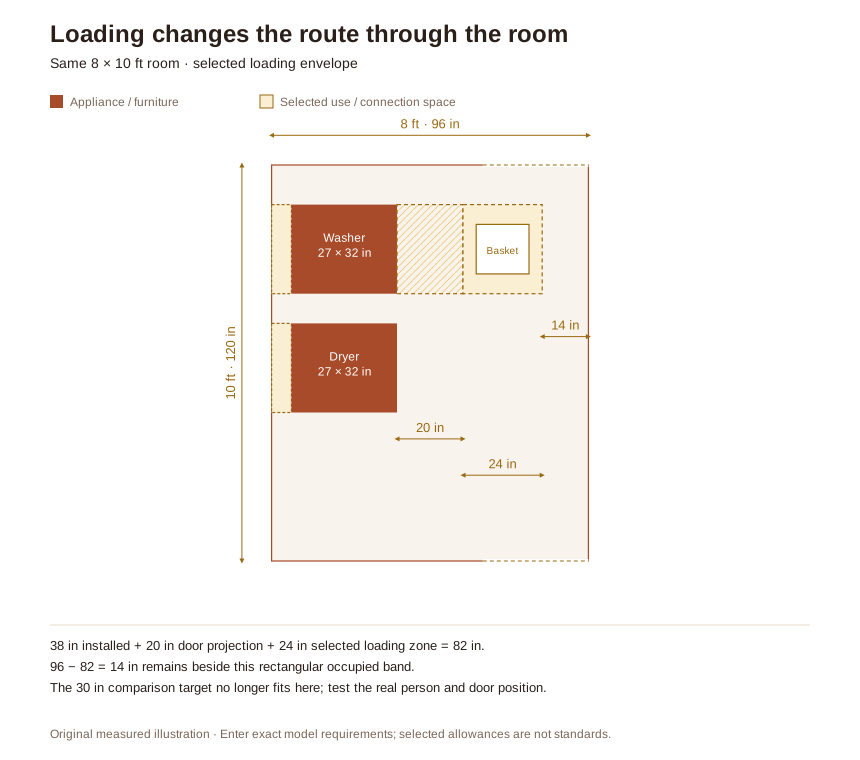
Suppose the appliance door in this example projects 20 inches beyond the closed front. It reaches 58 inches from the left wall, leaving 38 inches to the right wall. That number accounts for the open-door envelope only; nobody is unloading yet.
Now reserve a further 24-inch-deep zone beyond that envelope for the chosen person-and-basket position. The combined illustrative loading band reaches 82 inches from the left wall. The remaining width is 96 − 82 = 14 inches.
The 24-inch zone is an illustration input, not a standard size for a person or an instruction to stand directly behind every appliance door. Real loading may happen beside the door, and actual swings can leave differently shaped gaps. Test that position with the real machine and basket.
The comparison still reveals something useful: the empty aisle and the occupied aisle answer different questions. The second arrangement cannot support the same straight 30-inch band beside the chosen loading zone. A more detailed real-world test may find another arrangement, but the closed-state drawing does not prove it.
Try transferring a load as well as filling the washer. Both appliance doors may be open, and a damp basket may move from one side to the other. If the transfer needs the whole aisle, include that moment in the assessment.
Change the layout around the conflict
First, question furniture that makes the route narrower without helping a frequent task. A deep counter opposite the machines can take space from both loading and passing. A shallower surface or a surface elsewhere may be more useful than trying to squeeze between every addition.
Next, test an appliance arrangement that moves the loading activity out of the line between the openings. That could involve a different wall or a compatible stack, but connection locations, installation requirements and service access may limit the choices. Discuss feasible positions before assuming every rectangle can rotate freely in the real room.
A sink needs its own working position. If someone using it occupies the same band as a person passing, check whether the room is expected to support both tasks together. Include cabinet-door use beneath the sink rather than treating its closed footprint as the whole demand.
A folding surface or drying rack should be drawn deployed as well as stored. “It folds away” helps only when it is actually put away before the route is needed. Decide where the clothes go during drying, not just where the empty rack hangs afterward.
Make a deliberate basket parking place outside the through-route. Use our laundry organization guide for the everyday sequence and supply locations. The route should not depend on every load immediately reaching the next room with no waiting basket.
Rehearse the shared room at its busiest ordinary moment
Mark the furniture and proposed route on the floor. Have one person open and unload a machine while another carries something through. Watch where either person turns sideways, pauses in a doorway or shifts the basket with a foot.
A pause may be acceptable for an occasional noncritical journey, but it is a household tradeoff to assess, not proof that the layout accommodates simultaneous use. Where the route must remain available, choose an arrangement that respects that requirement during the tasks that actually occur.
Also test maintenance access. CPSC's clothes-dryer safety guidance explains the importance of keeping the dryer area and airflow system accessible for cleaning. A rack or cupboard that is convenient during laundry should not permanently prevent that work.
Save separate closed and loading versions of the plan. Label the task and the selected assumptions so you can compare them later. A single tidy drawing tends to hide the very moment that matters most in a walk-through room.
Questions about a walk-through laundry room
Can the loading area overlap the walkway?
It can in a drawing, but then the tasks may compete. Check whether the route must remain available, who uses it and what happens while the machine is being loaded.
Does a second doorway guarantee a through-route?
No. The openings need a connected path through the occupied room. Their positions, clear widths and door movements all affect that path.
Will a shallower washer solve the problem?
It may help, but compare installed depth, door movement and loading position together. A smaller closed body does not automatically produce the same saving during use.
Final Takeaway
Test a small walk-through laundry room in more than one state. Protect the route the home needs, then check loading, transfers, baskets and folding against it. A clear empty aisle is a starting point; the occupied room is the decision.
Set your room and openings, place the washer and dryer side by side or stacked, open their doors, and check the loading space and the route before you move anything.
More small laundry room guides: Plan a small laundry room · Stacked or side by side · Small laundry closets · Small laundry room storage ideas · Organize a laundry room
Main Sources
- Whirlpool: How to check venting — preserving the dryer exhaust arrangement.
- CPSC: Overheated clothes dryers — keeping equipment and airflow paths accessible for maintenance.
Both diagrams use original hypothetical furniture and loading envelopes. The 30-inch route target and 24-inch use zone are selected comparison inputs, not code, accessibility or ergonomic requirements.