Plan a small laundry room layout around the machines in use: installed, with doors or lids open and room to stand with a basket. Then add a counter, sink or storage one piece at a time. In the 6 × 8 ft example, an 18″-deep counter opposite the machines cuts the space in front of them from 65″ to 47″.
A small laundry room needs room for the machines, but also for the person using them. Start with the appliances in their installed positions, draw the doors or lids open, and leave somewhere to stand with a basket. Add a folding surface, sink or storage after those everyday movements work.
The measurements in a product listing are only the beginning. Connections, installation allowances and the way you load a machine can change the space it occupies. A neat pair of rectangles on a floor plan can hide a washer door that blocks the entrance.
Use the Small Laundry Room Layout planner to compare your measurements. The examples here explain a planning sequence; they are hypothetical arrangements, not installation specifications or recommendations for a particular appliance.
1. Measure the room and the machines separately
Measure the room between its finished surfaces. Record baseboards, a projecting pipe enclosure, the window sill and any other fixed interruption. Mark the width and position of each opening, including the direction a hinged room door swings. A door shown as a thin line while closed needs more space when somebody enters.
Locate the existing connections without assuming they can move. Water, drainage, electrical supply and a dryer's exhaust arrangement can constrain the appliance positions. Discuss a proposed change with the appropriate qualified installer. The floor plan helps you describe the desired arrangement; it does not determine whether the services can support it.
For each appliance, collect the exact model's outside width, depth and height, plus its installation instructions. Check whether the listed depth includes the projecting door and controls. Shipping dimensions describe the packaging, not the installed machine.
Record the required installation spaces separately. A rear connection allowance is not extra cupboard space, and a gap required beside a machine is not automatically a parking place for a cart. Use the requirements for both appliances, rather than applying whichever manual gives the smaller number.
Keep an honest “not checked yet” entry when a measurement is unknown. Guessing a small rear allowance can make a drawing look successful while leaving no room for the real connections. Resolve that uncertainty before relying on the layout or ordering furniture to fit around it.
2. Draw loading and maintenance as well as the closed machines
For a front-loading machine, note how far the open door projects beyond the closed front. The full door-open depth and the extra projection are different measurements. If you add the full door-open depth to the closed machine depth, you count the body twice.
For a real example of that distinction, Maytag's MFW7020 dimension guide lists 32 15/16 inches of product depth and 52 15/16 inches with the door open. The difference is 20 inches. Those figures describe that model; they do not set the required loading space for every washer.
The open door still needs a person beside it. Decide where you will stand, bend and set down the basket. Consider the transfer to the dryer as well: opening each appliance individually does not prove both can be used conveniently together.
A top-loading washer raises a different question. Record the full lid movement and the height reached when it is open, then check your ability to reach into the drum. A two-dimensional floor plan cannot establish either. For shelves and brackets above the machine, use the detailed checks in our existing small laundry room storage guide.
Finally, identify the access you use less often: the lint filter, detergent drawer, user-accessible filter panel and the route for removing an appliance. A permanent counter or cabinet can make an otherwise workable machine difficult to service.
3. Start with the appliances in a 6 × 8 room
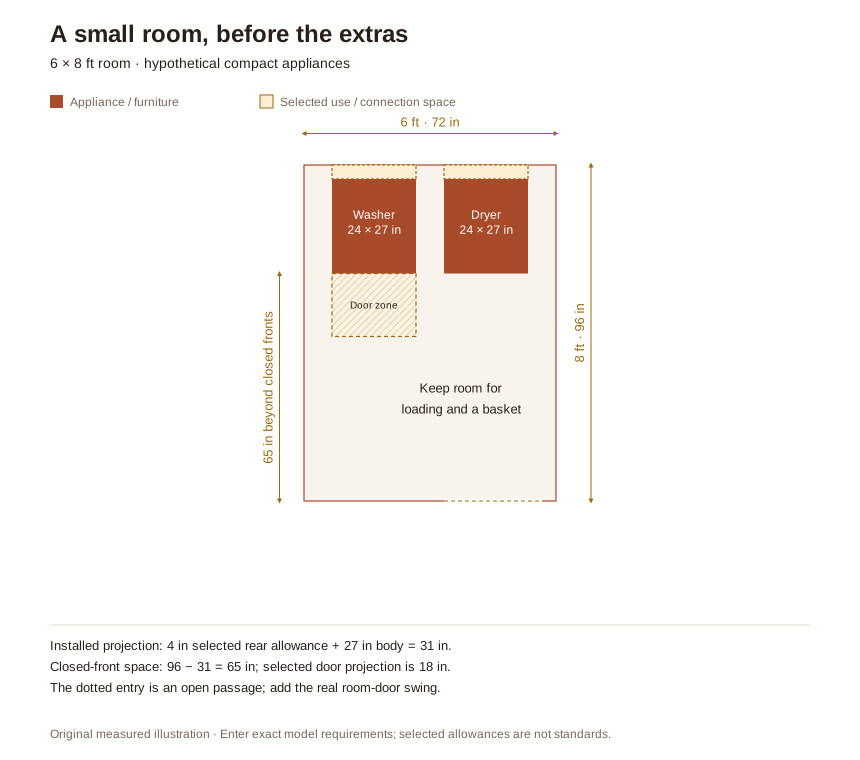
Our first example is a room 72 inches wide and 96 inches deep. Two hypothetical appliances, each 24 inches wide and 27 inches deep, sit along the back wall. The drawing reserves 4 inches behind them, so their closed fronts sit 31 inches from that wall.
The two bodies use 48 inches of the room's width. Their particular positions leave 8 inches at each outer side and an 8-inch gap between them. These are drawn spaces to compare against the eventual model instructions, not approved installation gaps or an invitation to fill the middle slot.
Suppose a door projects another 18 inches into the room. There would be 47 inches between its farthest point and the opposite wall before adding a basket, a person or another piece of furniture. That arithmetic describes a distance; it does not certify comfortable loading.
The entrance in this example is an open passage. A real swinging door could change the result. Add yours to the drawing instead of copying the example's apparent open floor area.
4. Add one useful surface and recalculate
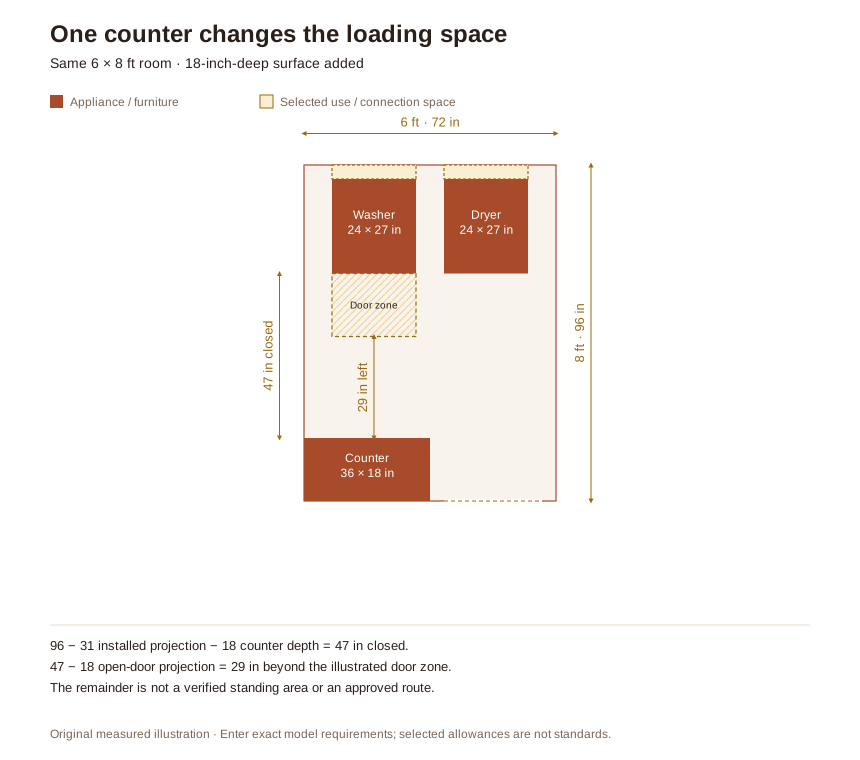
Now consider an 18-inch-deep folding counter on part of the opposite wall. Where it faces the machines, the closed-front space falls from 65 to 47 inches. With the same 18-inch open-door projection, only 29 inches remain between that door envelope and the counter.
The counter may fit physically and still make the room harder to use. Try moving it beside the machines, reducing its depth, or using another nearby surface for folding. A fold-down surface needs two drawings: one stored and one deployed. Its brackets, support and attachment requirements also need checking.
A utility sink creates a similar tradeoff. Measure the entire cabinet or stand, not just the bowl, and include the space used by its doors. Decide which real tasks justify it before committing part of a small room to another fixed piece.
Choose the surface that solves your most frequent inconvenience. If clean clothes already go to a nearby table, extra floor space for loading may be more valuable than another counter. Keep the room's actual routine ahead of a showroom checklist.
5. Rehearse a complete load before settling the plan
Tape the outlines on the floor and use the real basket. Enter with it, reach the controls, open the washer, transfer a load and retrieve the empty basket. Keep every door in the position it would occupy during those tasks.
Ask a second person to try the room if it serves more than one user. Differences in reach, bending and preferred loading position can reveal problems that a symmetrical drawing misses. If the room also connects two parts of the home, test the passing route during loading rather than only with everything closed.
After the space works, use our laundry organization guide to assign supplies and baskets to the routine. Keep service access and installation spaces available. Whirlpool's venting guidance specifically identifies a dryer pushed back against its vent as a cause of crushed venting; gaining a few floor inches is not a reason to compress that connection.
Questions about a small laundry room layout
Can I plan from standard washer and dryer dimensions?
Use rough sizes only for an early comparison. Before buying or building, replace them with the selected models' outside dimensions, installation requirements and operating measurements.
Does a clear planner result confirm installation?
No. It checks the entered geometry and selected routes. Connections, ventilation, support, electrical requirements, reach and local requirements need their own checks.
What should I add first after the appliances?
Add the piece that solves a daily problem, then test the room again. A counter, sink and tall cupboard do not all need to fit for the room to work well.
Final Takeaway
Plan a small laundry room around the machines in use. Separate the appliance bodies, installation allowances and loading space, then add furniture one piece at a time. The useful layout is the one that supports the whole routine with your actual equipment.
Set your room and openings, place the washer and dryer side by side or stacked, open their doors, and check the loading space and the route before you move anything.
More small laundry room guides: Stacked or side by side · Small laundry closets · Walk-through laundry rooms · Small laundry room storage ideas · Organize a laundry room
Main Sources
- Maytag MFW7020 dimension guide — product dimensions, open-door depth and model-specific planning notes.
- Whirlpool: How to check venting — preserving the dryer vent arrangement.
Room diagrams and calculations are original illustrative examples. Enter the requirements for your exact appliances; the drawn allowances are not installation, accessibility or code specifications.