The best small laundry room ideas use space you can reach without blocking a machine, a door or the place you stand to unload. Start by checking the space above the appliances, then any usable side gap. Add storage opposite the machines only after measuring the aisle with their doors open.
A shelf can fit on the wall and still stop a washer lid from opening. A slim cart can fit between two appliances and still be impossible to pull out. The useful measurement is the space left after the machines can operate, receive maintenance and stay installed as their manufacturers require.
Test the floor space before adding storage in the Small Laundry Room Layout Planner. Add a cabinet or hamper, enter the actual machine dimensions and compare the route with the appliances closed or in use.
Small laundry room ideas start with the machines in use
Find the installation instructions for each appliance’s exact model. Product dimensions describe the machine; shipping or carton dimensions describe its packaging. Neither automatically tells you the space an installed appliance needs, including connections and required clearances.
Record the installed position of the front, sides and top. Then open the washer, dryer and detergent dispenser fully. Check the space used by the lint filter, controls and any user-accessible maintenance panel. Keep water shutoffs reachable and preserve access to hoses, the dryer exhaust and servicing routes.
Front-door movement can change the available floor space substantially. For example, Maytag’s dimension guide for the MFW7020RU/RF/RW lists a product depth of 32 15/16 inches and a depth with the door open of 52 15/16 inches. That is 20 inches of additional forward projection. It does not include a place for you and a basket to stand, or establish the installation clearance for another machine. See the Maytag planning dimensions, pages 2–5.
Use the following table to identify the most promising storage location before shopping.
| Location | What to measure | Storage to consider | What can rule it out |
|---|---|---|---|
| Above a top-loading washer | Full lid movement, rear controls, shelf underside and brackets | Shallow wall shelves outside the lid’s path | A lid that hits a shelf, bracket or hanging item |
| Above front-loading machines | Controls, dispenser access and comfortable reach | Wall cabinets or shelves; a separately supported counter where permitted | Blocked access or a counter that prevents appliance removal |
| Beside or between machines | Usable width after appliance allowances, maximum cart width and pull-out path | A narrow removable cart | Hoses, trim, wheel clearance or a room door in the way |
| Opposite the machines | Shelf depth, appliance door movement and remaining standing space | Shallow open shelves | An aisle that becomes awkward when unloading |
Above the machines: leave room for the lid and your hands
For a top-loading washer, measure from the floor to the highest point of the fully raised lid. Also watch its entire opening path. A shelf may sit above the open lid while a bracket below it catches the lid halfway up. If you are buying the washer, use its dimension drawing and installation instructions before fixing anything to the wall.
LG’s WT7400C series, a 2022 model, illustrates the difference: its specification table lists 44½ inches in product height and 57¼ inches with the lid open. Those are model-specific dimensions, not a universal shelf-height recommendation. Shelf thickness, brackets, installation requirements and your ability to load the drum still matter. See LG’s WT7400C builder specification sheet, page 2.
Choose shelf depth around what you will store. A row of bottles or a folded towel stack may need less depth than a large basket. Check the actual items, including handles and anything projecting over an edge. A deep shelf can make the back row difficult to reach across a machine.
With front-loading appliances, test the detergent drawer and controls before choosing a countertop. Plan its support and removal around the appliance and counter instructions; do not assume the machines can carry it. An independently supported counter can still cause trouble if fixed trim prevents a washer from coming out for service.
Wall storage also needs a suitable fixing method. IKEA’s BOAXEL guidance explains that wall material affects the supported load, fasteners must suit the wall, and stated maximum loads assume even distribution. Follow the selected shelf system’s complete installation instructions and load limits, including how the wall uprights are secured. A loaded shelf is more than the weight of the empty board. See IKEA’s BOAXEL mounting guidance.
Beside and between appliances: size the usable gap
A narrow cart is useful when it brings the back row of supplies within reach. It needs both a parking space and a route out. Measure the narrowest width along that route, including baseboards, appliance handles, cabinet trim and the cart’s wheels or handle.
Start with the gap left after preserving the appliance manufacturer’s allowances. If a manual requires space alongside a machine, that space is not automatically available for a cart. Check both appliances where the storage sits between them.
Here is an illustrative shopping calculation: suppose a completed installation leaves a 12-inch usable storage slot, with all appliance requirements already accounted for. A cart whose widest assembled part measures 10 inches leaves 2 inches total, or 1 inch on each side if centered. Those inches are an example of cart movement room, not a recommendation for appliance clearance. A cart labeled “10 inches” still needs its wheelbase and handle dimensions checked.
Now test the pull-out. Mark the cart’s full depth on the floor in front of its parked position. Can it move far enough for you to reach the rear items without blocking the room door or striking an open washer? A shorter cart may work better even when a deeper one fits while parked.
Do not gain storage space by pushing a dryer farther back without checking its connections. Whirlpool identifies a dryer pushed back against its exhaust as a cause of crushed venting. Keep the vent arrangement and maintenance access intact. See Whirlpool’s vent-check guidance.
Once you know the genuinely usable width, depth and height, try the cart or cabinet in the Small Laundry Room Layout Planner. Its checks do not replace appliance installation checks or confirm that a particular cart will work.
Opposite the machines: protect the unloading space
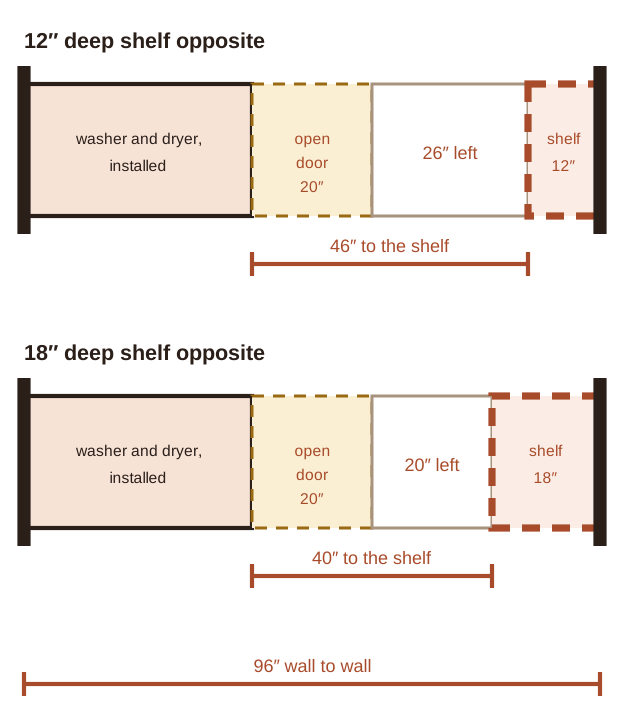
An empty wall opposite the washer can look like obvious storage space. Every inch of shelf depth, however, comes out of the aisle. Measure from the installed appliance front to the opposing wall, then subtract the deepest part of the proposed storage, including handles.
Consider this illustrative geometry, not a recommended laundry room layout. A room is 96 inches deep, and an installed washer’s front sits 38 inches from the rear wall. A 12-inch-deep shelf against the opposite wall leaves:
96 − 38 − 12 = 46 inches between the washer front and shelf.
If that washer’s door projects 20 inches into this space, the distance between the door’s farthest point and the shelf falls to 26 inches. A deeper, 18-inch shelf reduces those figures to 40 inches closed and 20 inches with the door open. Neither result proves comfortable or accessible loading; door width, swing direction, basket position and the user still need checking.
Tape the proposed shelf front onto the floor. Open the real machine and practice unloading into your usual basket. Include the room door and a second person if the room is also a passage. If you keep stepping around a basket or turning sideways, reduce the shelf depth or leave that wall clear.
Open shelves avoid another set of doors, but their contents still need room to move. Pull a basket fully out during the trial. For a cabinet, include its door swing or drawer extension in the same test.
Questions people ask
How high should a shelf go above a washing machine?
There is no single height for every washer. Check the exact model’s installation instructions and fully open lid height, then include shelf thickness, brackets, controls and comfortable reach. For a front loader, check the dispenser and service access as well.
Can I put a cart between my washer and dryer?
Yes, if the remaining usable gap accommodates it without taking required appliance space or interfering with connections. Check the cart’s widest assembled dimension and its pull-out route, not just the advertised shelf width.
Is a deep cabinet better than shallow shelving?
Only if you can use its depth. A deep cabinet may hold more while making loading awkward or hiding items at the back. Start with the items you need to store, then test the smallest depth that holds them comfortably.
Final Takeaway
Measure the machines with their doors and lids open first, then fit storage above, beside and opposite them around that space. A shallower shelf that leaves room to unload is worth more than a deeper one that doesn’t.
Set your room and openings, place the washer and dryer side by side or stacked, open their doors, and check the loading space and the route before you move anything.
More small laundry room guides: Plan a small laundry room · Stacked or side by side · Small laundry closets · Walk-through laundry rooms · Organize a laundry room
Main Sources
- Maytag MFW7020RU/RF/RW dimension guide, W11685934B — product dimensions, door-open depth and installation-planning distinctions.
- LG WT7400C builder specification sheet — product height and lid-open height.
- IKEA BOAXEL laundry combination — wall fasteners and load guidance.
- Whirlpool: How to Check Venting — crushed dryer vent checks.