Base a small dining room layout on the meals you actually eat: draw the everyday seats and the way to reach them first, then add storage only where it can operate. The examples reserve 30″ out from the table edge for each chair, in an 8 × 10 ft and a 10 × 12 ft room.
A small dining room works best when its plan starts with the meals you actually eat. Put the everyday seats on the drawing first, leave room to reach them, and add storage only after those movements work. A table that fits between the walls can still make breakfast awkward if someone has to stand up whenever another person leaves.
You do not need a perfectly symmetrical arrangement. Two people may be happier with a table near one wall; a household of four may need seating along both long sides. The useful question is whether your chosen arrangement supports an ordinary evening, including carrying food in and clearing up afterward.
Use the Small Dining Room Layout planner alongside this guide. Start with your own room and furniture measurements, then compare the table position with the seats occupied. The two measured examples below show the reasoning, rather than dimensions to copy without testing.
1. Draw the room before choosing its center
Measure between the finished wall surfaces, then record the things that interrupt that rectangle: a chimney breast, radiator, window sill, door opening or shallow alcove. A room listed as 10 × 12 feet may offer less useful floor space beside a projecting feature. Mark the projection instead of rounding it away.
Next, draw every entrance. Include the door leaf and its swing where there is a hinged door, and note which opening leads to the kitchen. The route from that opening to the table usually matters more than centering the tabletop under the room's ceiling light. Another route may need to continue through the room to the garden or living area.
Make a short list of the jobs this space has to do. For example: two breakfasts every day, four people at dinner, homework twice a week and a clear path to the back door. Separate those jobs from occasional wishes. Six holiday guests are a different planning problem from four people sitting comfortably every evening.
If the table shares a room with a sofa, use our guide to dividing a small living and dining room for the larger zoning decision. This guide concentrates on arranging the dining area itself.
2. Give each everyday seat a place on the plan
Draw the actual tabletop, then place the chairs you intend to use. A table described as seating four does not tell you whether your four existing chairs work between its legs. Measure chair width, arms and depth, and check the table's base and apron—the frame immediately below the top.
For each chair, distinguish its furniture footprint from the space you reserve to sit down and get up. In the planner, chair-use depth is measured outward from the table edge. That zone is a planning allowance, not a measurement of the chair alone. It should reflect the chair and the person using it.
Our illustrations reserve 30 inches outward from the table edge for each drawn chair position. That is an illustrative input, not a recommended minimum or a promise of comfortable access. It also does not include a separate passing lane behind someone who is seated.
For context, IKEA's dining guide suggests about 43–47 inches from the table edge for pulling out a chair and squeezing past, and 51–59 inches for a wider walkway behind seated diners. Those are retailer planning suggestions, not building-code requirements. Their measurement starts at the table, so do not add a chair's depth twice.
3. Small dining room layout: compare a two-person plan with a four-place plan
Two places: a 30-inch table against the wall
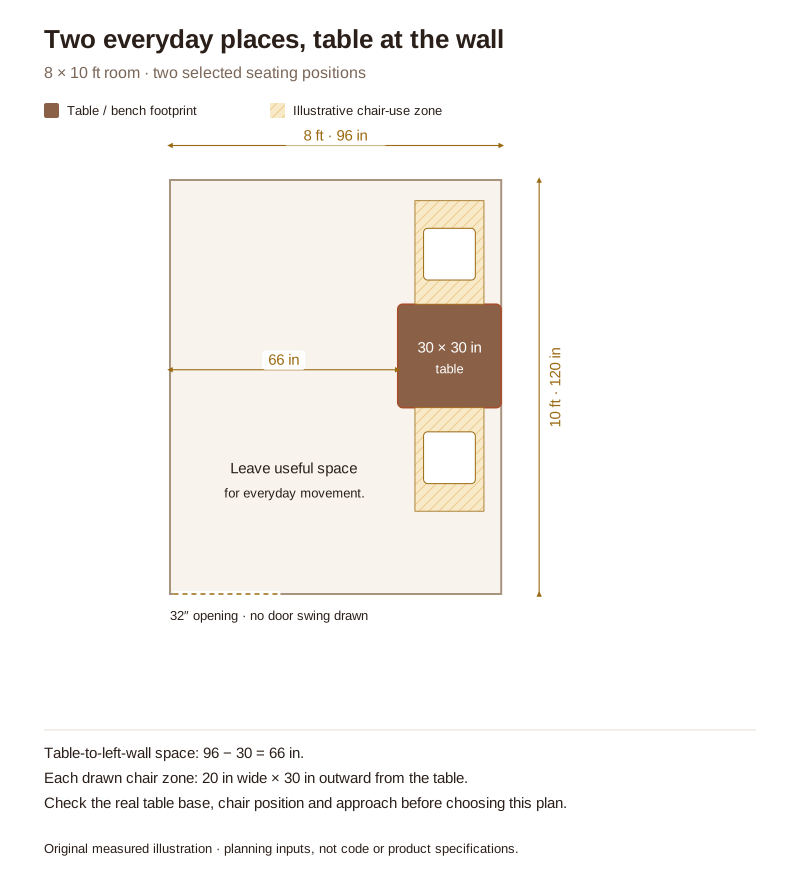
In this first example, an 8 × 10-foot room measures 96 × 120 inches. A 30-inch-square table sits against the right wall, with one chair at each of its two exposed parallel edges. There is no chair drawn between the table and the wall, or at the left end.
The wall position frees the middle of the room. It works only if this table and its base permit the two selected seating positions. If you need to work facing a laptop across the table, or routinely sit opposite three other people, the arrangement solves the wrong problem.
Four places: a 48 × 30-inch table with open ends
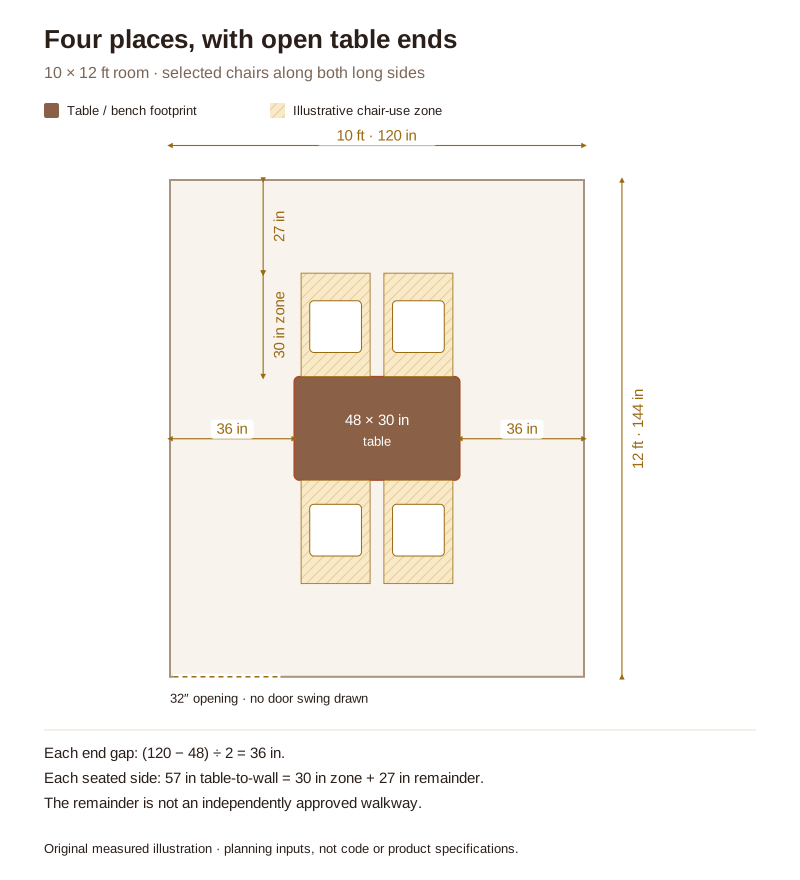
The second example uses a 10 × 12-foot room, or 120 × 144 inches. A 48 × 30-inch table has two drawn chair positions along each long side. It leaves 36 inches at each unseated end. Above and below the table, the 57-inch table-to-wall distance contains the illustrated 30-inch chair-use zone plus 27 inches beyond it.
These four drawn positions are places to investigate, not a seating-capacity certification. Table legs may conflict with the outer chairs, and wide chairs may need different spacing. Tape the arrangement on your floor, put the real chairs in place and have everyone sit down before choosing it.
4. Add storage, then rehearse a real meal
Once the table and seats work, try the smallest amount of storage that answers a specific need. A sideboard for plates belongs near the serving route, but it also needs room for its doors or drawers. Record its closed depth and its opening space separately. A cabinet that fits closed can still be unusable during dinner.
In the four-place example, putting an 18-inch-deep cabinet against an end wall would reduce that end's 36-inch gap to 18 inches before any cabinet opening is considered. The drawing makes the tradeoff visible. Moving the cabinet elsewhere may be more useful than shifting every seat to accommodate it.
Use the manufacturer's mounting instructions for storage furniture; CPSC's Anchor It guidance explains why securing top-heavy furniture matters. Also check that the proposed position leaves heating equipment and required access unobstructed.
Now rehearse the room with everyone seated. Carry an empty serving dish from the kitchen, take the innermost place, get up during the meal and open the storage you actually use. Notice where someone has to turn sideways, move a chair or ask another person to stand. Those observations are more useful than a drawing that merely looks balanced.
The planner can flag the overlaps and routes it models. It cannot verify a person's comfort, the space under a tabletop or every curved gap beside a round table. Its route widths are adjustable planning targets, and a clear result is not an accessibility or code assessment. Keep the version that works with your furniture and household, then add decoration around it.
Questions about small dining room layouts
Does the table have to sit in the center?
No. A wall position can suit a table with seating on selected sides. Center it when access and the room's other jobs benefit, rather than treating symmetry as the starting rule.
Can I count an end chair as an extra place?
Only after checking the actual base, the neighboring diners and that chair's entry space. Adding a chair to the drawing also changes the route around that end.
What should I remove first if everything feels tight?
Start with pieces that do not serve an everyday need, such as a spare chair or oversized storage. Preserve the seats and movements your household uses most.
Final Takeaway
Build your small dining room around its ordinary meal: the people, their chairs and the route to each place. Compare furniture with seats in use, add storage only where it can operate, and test the chosen plan at full size before buying.
Set your room, door and window, add a round or rectangular table with its chairs, a bench or a sideboard, and check the way to each seat before you move anything.
More small dining room guides: Round or rectangular table · A bench or chairs at the table · Drop-leaf or extendable tables · A dining table in a small living room · A living room and dining room in one
Main Sources
- IKEA: Your guide to choosing the perfect dining table — retailer guidance on table-edge space and everyday use.
- Room & Board: How to design a dining room — dining furniture, seating and room-planning considerations.
- CPSC: Anchor It — furniture anchoring guidance.
Room dimensions, furniture placements and arithmetic in the diagrams are original illustrative examples. They are not construction specifications or tested product recommendations.