These small shared bedroom ideas give each person a place of their own and a clear way to reach it before adding a divider. In the 10 × 12 ft examples, two 42 × 80″ beds keep a 36″ central aisle: a short 4 × 40″ screen splits the head ends, or staggering the beds by 40″ separates them with no screen at all.
Privacy in a small shared bedroom starts with a place that belongs to each person and a clear way to reach it. A divider can help with sightlines, but it cannot rescue a layout where one sleeper must cross the other’s bed to get dressed or leave the room.
Arrange the beds and storage first. Then decide whether a short screen, different bed positions or a simple agreement about light and noise would solve the actual problem. The two 10×12 plans below show how much floor space a divider uses and what changes when you remove it.
Small shared bedroom ideas start with the privacy problem
Ask each person what feels difficult. They may need somewhere to change clothes, a quieter bedtime, a surface where belongings stay untouched, or a light that does not shine into the other bed. These are different problems with different solutions.
Divide useful resources fairly rather than dividing the floor into identical halves. One person may need a desk every afternoon while another values a larger clothing drawer. Agree what is personal and what is shared, including the desk, mirror, charger and display shelves.
Do not base the plan only on age or gender labels. Similar-looking furniture does not guarantee that either person can use it comfortably. Let both sleepers test the entrance route, storage reach and bedside light from their own positions.
If the bed arrangement is still undecided, start with the two beds in a small room guide. This article focuses on living with the arrangement once each sleeping place has a workable footprint and approach.
Give both beds a route to the door
Draw a line from the entrance to the accessible side of each bed. Neither line should depend on stepping over a mattress, moving a divider or climbing across someone else’s belongings. Repeat the check with storage open and a chair in its normal position.
Measure bed frames outside to outside. Add the footprint of a screen’s feet, not just its thin panel. A folding divider may be advertised by its flat width even though it must stand in a zigzag position; the stable installed outline is the shape the room must accommodate.
The Small Bedroom Layout Planner lets you compare beds, a screen and entered storage-use spaces. Keep its result in proportion: the plan can expose a blocked approach, but it cannot certify a divider’s stability, sound reduction or compliance with local bedroom requirements.
Plan 1: separate the head ends, keep the lower approach open
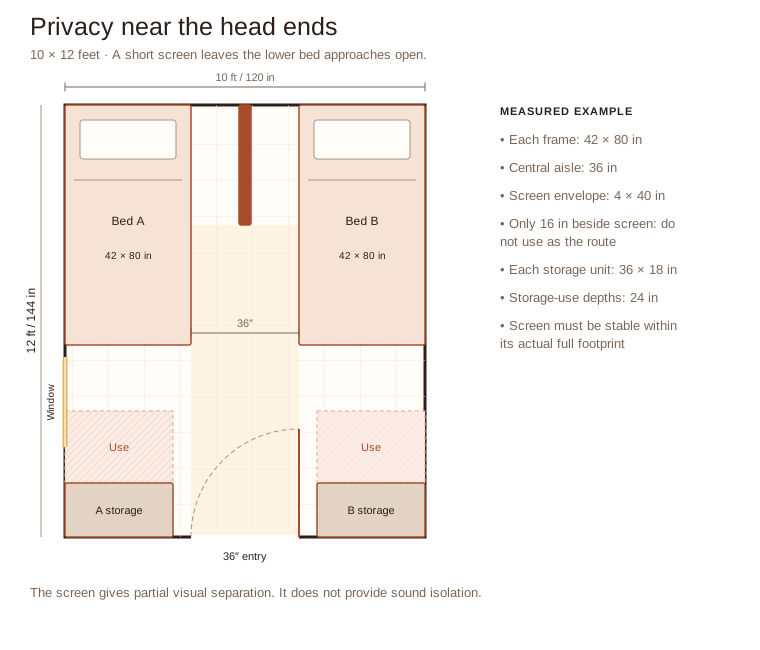
The room is 120 inches wide by 144 inches long. Two illustrative 42×80-inch frames sit along opposite side walls. They leave a thirty-six-inch central gap: 120 − 42 − 42 = 36.
A short screen occupies a 4×40-inch envelope centered on the top wall. Its ends stop halfway along the beds. Each side of the screen has only sixteen inches to the nearby frame, so those narrow upper strips are not the intended approaches.
Below the screen, the full thirty-six-inch aisle is available. Each person enters their bed from its lower side section, and the aisle continues toward the doorway. This may provide a little visual separation near the pillows while preserving a common entrance area.
The screen’s four-inch depth is an illustrative complete installed footprint. Many freestanding screens need broader feet or angled panels and will not fit that envelope. Use a suitable product’s real stable outline; do not build a narrow unsupported panel to match the drawing.
Two 36×18-inch storage units occupy opposite bottom corners. Each has a twenty-four-inch illustrative opening-and-use zone in front. Those zones sit beside the central approach, so opening a drawer does not consume its full width. The entry door is centered toward the bottom, and its swing remains clear.
The planner reserves the full selected long side of a bed. Its wider 12×12 privacy example keeps that strip clear. The shorter approach shown here needs a separate tape-out check; do not shrink a planning target simply to remove a warning.
The screen gives only partial visual separation. Someone standing in the lower room can still see both beds, and sound still travels through the shared space. If the need is private changing, agreeing a short period alone in the room may work better than expecting this panel to provide it.
Plan 2: stagger the beds and remove the divider
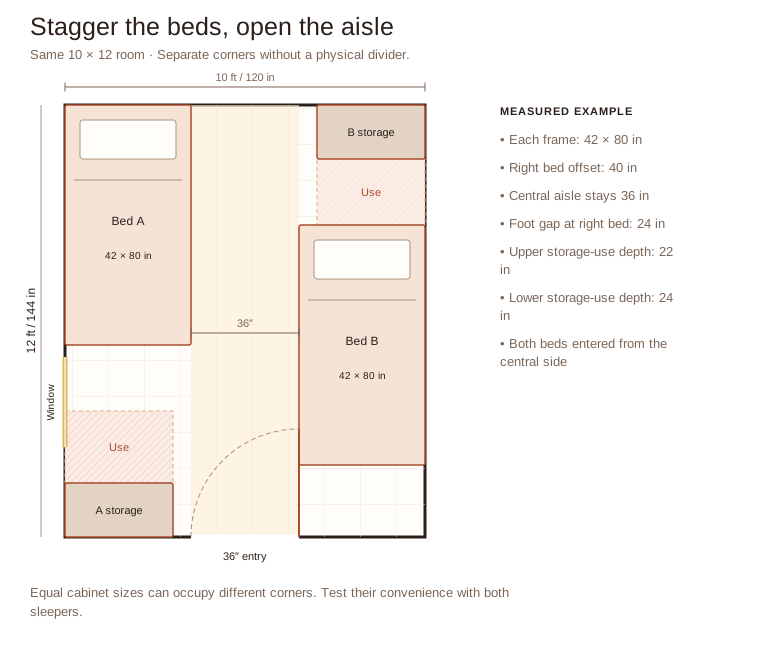
Keep the same frame sizes but move the right bed forty inches toward the bottom wall. Its foot now ends 120 inches from the top wall, leaving twenty-four inches to the bottom. The left bed stays in its original position.
The beds’ head positions are staggered and the screen disappears. The central thirty-six-inch aisle is uninterrupted beside both beds. This is useful when separate head areas matter more than a physical visual barrier, or when a divider’s real feet consume too much space.
Move the right-hand storage unit into the upper right corner, where the offset creates room for it. The example cabinet is eighteen inches deep, followed by a twenty-two-inch use zone before the head of the right bed. That twenty-two-inch allowance must be checked against the actual drawer and user; it is not a recommended minimum.
The left storage unit stays in the lower left corner with its twenty-four-inch use zone. The storage positions are different, but each sleeper gets the same cabinet footprint. Test whether both locations are equally convenient before calling the arrangement fair.
Use storage and lighting to make the arrangement personal
Give each sleeper a clearly defined drawer or shelf that the other does not need to open. Place shared supplies in a neutral location reachable from the common aisle. This reduces trips through another person’s area without adding another furniture piece.
Anchor storage as required by its instructions. The CPSC’s Anchor It guidance recommends installing furniture anti-tip devices and keeping tempting objects from encouraging children to climb. A bookcase used as a room divider still needs a suitable, secure installation; simply turning it sideways does not make it stable.
Aim each reading light toward its own book or bed area and test it with the other person lying down. Keep cords out of the aisle. If a lamp needs a large bedside table, include that table before deciding the beds have enough separation.
Use color or bedding to identify each area without building a wall. Separate hooks and small labeled containers can provide clear ownership with little added footprint. Leave the main circulation area shared and keep it free of each person’s overflow.
Match routines to the room’s limits
A divider does little about an early alarm or a late video call. Agree quiet periods, where calls happen and how someone enters after the other is asleep. Put frequently needed morning clothes where they can be reached without switching on the main light.
If considering bunks to release floor space, check suitability separately. The CPSC’s bunk-bed guidance specifies no upper-bunk use for children under six, ladder access and one person on the upper bunk. Follow the bed’s mattress limits and assembly instructions; retain the required guardrails even beside a wall.
Keep the ladder approach free of screens, storage and hanging fabric. The planner’s floor view cannot assess overhead clearance, upper-bunk safety or climbing behavior. For a third sleeper, compare the three-bed guide rather than adding another mattress to the shared aisle.
Common questions
Will a curtain make the room quiet?
It can block some views, but should not be treated as soundproofing. Agree noise routines separately, and check the installation, cords, heat sources and window access.
Does every person need the same amount of floor space?
Not necessarily. Start with equally usable bed access and personal storage, then agree differences based on what each person actually needs.
Is a tall shelf better than a screen?
Only if it fits safely and solves the right problem. Include its full depth, secure installation and storage access. It may consume more useful floor than the belongings require.
Final Takeaway
Protect each person’s access and belongings before adding a divider. A modest screen or staggered bed arrangement can create a personal corner, while clear storage ownership and considerate routines make that corner useful every day.
Set your room, door and window, add one to three beds, a bunk, a guest bed, a desk or a privacy screen, and check the route to each bed before you move anything.
More small bedroom guides: Two beds in a small room · Three beds in a small room · Awkward small bedrooms · Small guest bedrooms · A desk in a small bedroom
Main Sources
- CPSC: Anchor It — furniture anchoring and tip-over prevention.
- CPSC: Bunk Beds Business Guidance — upper guardrails and mattress requirements.
- CPSC: Bunk Beds Test Manual — upper-bunk age, ladder and use warnings.