Plan a studio apartment furniture layout around the journeys you make every day, from the entrance to the bed, bathroom, kitchen and storage, before the finishing pieces. In the 12 × 18 ft example, one extra 34 × 30″ table beside the sofa leaves gaps of 26″ and 24″, both narrower than the 30″ comparison target.
A small studio works better when its everyday routes are part of the studio apartment furniture layout from the beginning. Draw the way from the entrance to the bed, bathroom, kitchen and storage before filling the open floor with furniture. Then repeat the journey with a chair pulled out, a wardrobe open and the bed ready for sleep.
You are looking for a connected room, not simply a collection of gaps. A generous space beside the sofa is little help if the dining table blocks the only way to reach it. Start with the movements you make most often and let the furniture arrangement grow around them.
The Small Studio Apartment Layout planner lets you work with a measured main-room rectangle. Enter the floor you can actually furnish, excluding a separate bathroom or other enclosed rooms. Its selected approach and route widths are planning inputs, not building-code or accessibility approvals.
1. Draw the room you use, rather than the area in the listing
Measure between the finished walls and mark every opening. Record the actual position of the entrance and the bathroom doorway, the window, projecting radiators, columns and fixed storage. Add the room-door swing. The corner that appears empty with the door shut may be occupied whenever someone comes home.
Keep the kitchen in its real position. Draw the full fixed footprint, then note the appliance doors and cupboards that open into the room. The new planner represents that area as a fixed service block with an entered use space; it does not design a kitchen or establish its installation requirements.
If you only know the apartment's advertised square footage, measure the main room before comparing layouts. A measured main-room plan answers a more specific question: whether your own furniture can work around your own openings.
Write unknown measurements beside the drawing. A missing door position is more consequential than an undecided cushion color. Resolve the fixed features first, because rearranging a sofa is a different decision from relocating plumbing or changing an entrance.
2. Mark destinations, then connect them
Choose the places you need to reach: the usable side of the bed, the seat at the desk, the front of the wardrobe and the kitchen work area. Put a small mark where your feet would be during each task. Connecting those marks reveals whether the middle of the room is doing useful work.
Trace three ordinary journeys. Come home carrying shopping and put it down. Leave the bed for the bathroom. Take clean clothes from their temporary landing place to storage. Include the turn at each end; a straight strip between furniture is only one part of a route.
Use a route width that reflects the people and things moving through your home. The diagrams below use 30 inches solely as a comparison target. They do not establish a minimum, guarantee comfort or account for every person's needs. Test wider paths where you need them, including with the basket, bag or mobility equipment you actually use.
A route may serve more than one task at different times. That can be a sensible use of a small room. The important distinction is between sharing a space deliberately and discovering that somebody has to stop working every time another person needs the bathroom.
3. Protect one connected band through a 12 × 18 main room
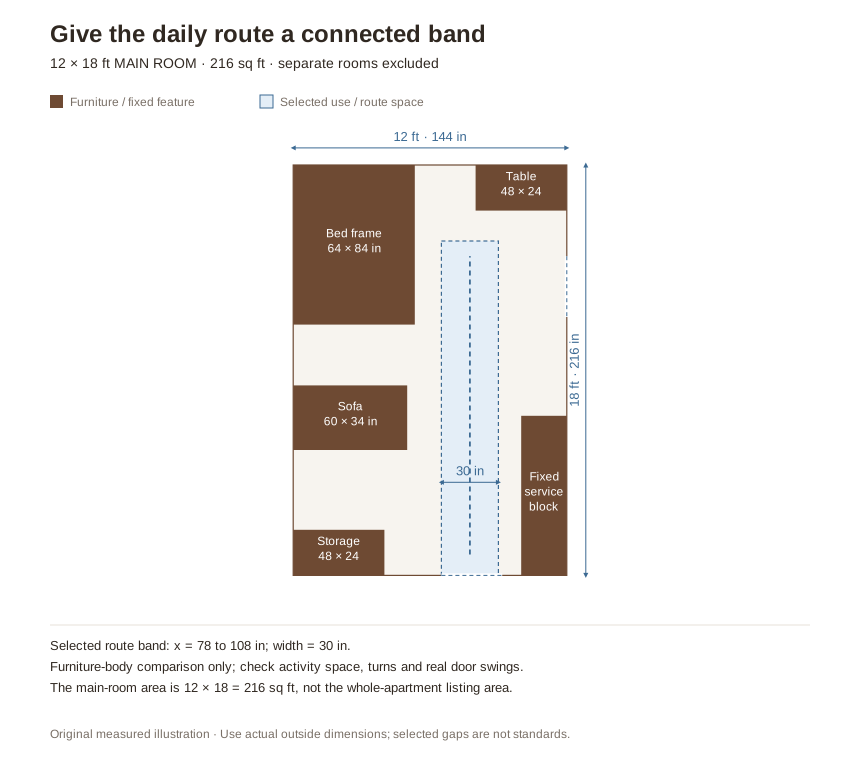
This illustration uses a 144-by-216-inch main room: 216 square feet of measured floor, not a 216-square-foot whole apartment. A hypothetical 64-by-84-inch bed frame occupies the upper-left corner. A 60-by-34-inch sofa sits farther down that wall, and a fixed 24-inch-deep service block occupies part of the right wall.
The route band does not have to sit in the geometric center. Here, it is placed between the larger furniture on the left and the fixed block on the right. A 48-by-24-inch table sits against the upper wall, outside the band's illustrated start. The drawing leaves the furniture-use positions for a separate test.
Notice what has not been added: a coffee table in the route, a deep entry cabinet or a freestanding divider. Each might be useful, but none should arrive by default. First decide which daily problem a new piece would solve and what part of the existing plan it would consume.
4. Watch what one extra table does to the pinch point
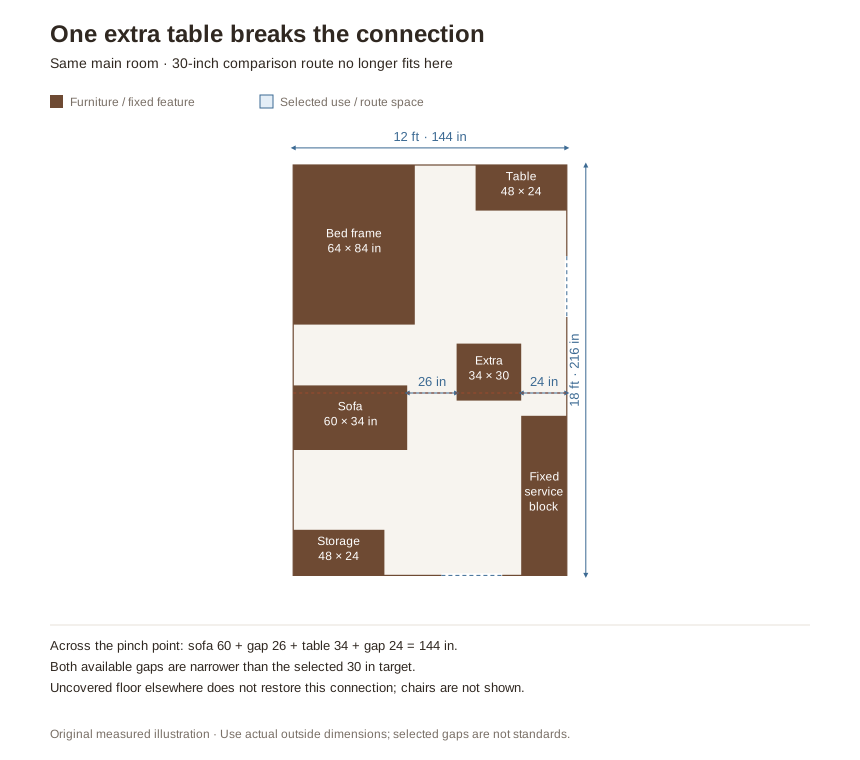
Move to the second drawing and add a 34-by-30-inch table near the sofa. At the narrowest row, the sofa reaches 60 inches across the room. The table begins at 86 inches and ends at 120. The gaps are therefore 26 inches between sofa and table, and 24 inches between table and wall.
There is still plenty of uncovered floor elsewhere. That does not repair this connection. Moving a few inches matters only if the resulting gap joins the rest of the route; pushing the table toward the kitchen may simply move the conflict farther down the room.
Try returning the useful surface to a wall, using a smaller piece, or sharing an existing table. Compare the task the table supports with the journey it interrupts. If you need the table every day, another piece may need to leave rather than making every gap progressively tighter.
5. Test the occupied room and the evening version
Now pull out the work chair and stand at the wardrobe. Reserve the area used by each activity, then check the through-route again. A path that works around closed furniture can disappear when the room is occupied. Conversely, two use spaces that overlap do not necessarily mean the physical furniture collides; they may simply require different times of use.
If you have a sofa bed, draw its complete open footprint. Give the coffee table and loose cushions a specific nighttime home. For a divider, test the deployed shape and the opening beside it, and don't treat visual screening as sound insulation.
Keep emergency planning separate from a furniture-fit result. The U.S. Fire Administration advises keeping doors and windows unblocked and practicing the household escape plan. Review your building's arrangements; a line drawn by a room planner does not certify an escape route.
Finish with tape on the floor and an ordinary evening at home. Walk the plan while carrying something, sit down, stand up and open what you use. Record the one or two awkward moments before changing the whole arrangement.
Questions about a studio apartment furniture layout
Should every gap have the same width?
No. A passing route, a place to stand and a gap between unused furniture do different jobs. Set and test each one for its actual use rather than applying one number everywhere.
Does a larger empty area mean a better layout?
Only if it is useful and connected. Several isolated patches can feel less workable than one continuous route with clear destinations.
Can I put furniture in front of a window?
Check the real window's operation, access, light, ventilation and any role in your building's emergency arrangements. A top-down fit drawing cannot settle those questions.
Final Takeaway
Plan the journeys before the finishing pieces. A small studio needs connected access to its everyday tasks in both its quiet, closed state and its occupied evening state. Keep the arrangement that works with your real movements, not just the one with the most furniture drawn inside the walls.
Set your main room, door and window, add a bed or sofa bed, a desk, a table or storage, and check the route by day and by night before you move anything.
Main Sources
- U.S. Fire Administration: Home Fire Escape Plans — keeping doors and windows unblocked and practicing the household plan.
Plans and calculations are original illustrative examples. Room dimensions describe only the shown main room. Selected route widths are comparison inputs, not code, accessibility or emergency-egress requirements.